|
My previous post explained that changes that are necessary to run an existing ASP.NET application in the Windows Azure environment. This post explains about using Azure ASP.NET membership and role providers in ASP.NET web application. |
 |
1. Download the code asp.net providers for Azure from the MSDN Code Gallery.
Add the downloaded project to your existing ASP.NET Solution and add a reference to the Project as well.
2. Expand your Azure Service project, in this case it is AzureStoreService, expand the roles node and double click the AzureStore node
3.Select the settings tab from properties dialogue window and click the Add Setting option
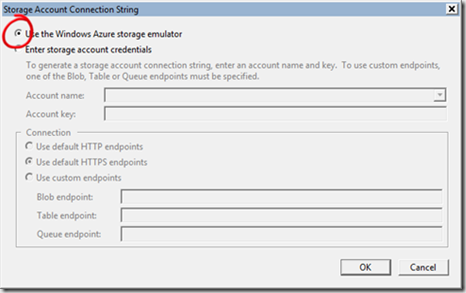
4. Give the name DataConnectionString for Name property and click ellipsis button to set the value. Select the option Use the Windows Azure storage as shown below
5. Save your changes that you made in AzureService project. Now Open the Web.Config file of your ASP.NET application and add the following element in the file
1: <configuration>
2: ...
3: <appSettings>
4: <add key="DataConnectionString"
value="UseDevelopmentStorage=true"/>
5: </appSettings>
6: ...
7: </configuration>
6. Add the following code in web.config file to use the membership providers
1: <!-- Membership Provider Configuration -->
2: <membership defaultProvider="TableStorageMembershipProvider"
3: userIsOnlineTimeWindow="20">
4: <providers>
5: <clear/>
6: <add name="TableStorageMembershipProvider"
7: type="Microsoft.Samples.ServiceHosting.AspProviders.
8: TableStorageMembershipProvider"
9: description="Membership provider using table storage"
10: applicationName="AzureStore"
11: enablePasswordRetrieval="false"
12: enablePasswordReset="true"
13: requiresQuestionAndAnswer="false"
14: minRequiredPasswordLength="1"
15: minRequiredNonalphanumericCharacters="0"
16: requiresUniqueEmail="true"
17: passwordFormat="Hashed"/>
18: </providers>
19: </membership>
Now the database is ready for the use.
8. Add the following code in Web.Config fie to use the Role provider
1: <!-- RoleManager Provider Configuration -->
2: <roleManager enabled="true"
3: defaultProvider="TableStorageRoleProvider"
4: cacheRolesInCookie="true"
5: cookieName=".ASPXROLES"
6: cookieTimeout="30"
7: cookiePath="/"
8: cookieRequireSSL="false"
9: cookieSlidingExpiration="true"
10: cookieProtection="All">
11: <providers>
12: <clear/>
13: <add name="TableStorageRoleProvider"
14: type="Microsoft.Samples.ServiceHosting.AspProviders
.TableStorageRoleProvider"
15: description="Role provider using table storage"
16: applicationName="AzureStore" />
17: </providers> </roleManager>
9.Right click the compute emulator icon and select Show Compute Emulator UI then you will get the following window where you can restart or suspend the Azure service.
| Share this post : |  |
 |
 |
 |
 |


[…] providers in ASP.NET web application. 1. Download the code asp.net providers for Azure from the… Read more… Categories: .NET Visual Studio 2010 Share | Related […]